First of all, there are 2 general types of branches you can have - Unpublished(local) and Published.

Published is accessible to all your team members and is also visible in Team Web Access (TWA).

So as you can see - my LocalBranch is not visible in list of branches from TWA.
To be able to work with Published branch you need a local copy of it - local branch. So you have - totally local branches - yours only, and local branches which are local working copy of Published branches.
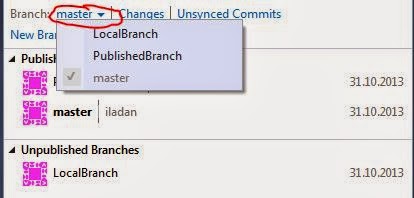
All local branches are accessible to check-out in Branches list:
Creating a Branch
To create a branch in Visual Studio go to Branches menu:

Select New Branch and provide name of the new branch and which branch it should be taken from.

You can publish any unpublished branch by right-click -> "Publish Branch" or keep it local if you want to.
A bit more...
You can see yourself which branches are connected to which published version -
From Branches explorer in Visual Studio select Actions and "Open in File Explorer":

From there navigate to a hidden folder named .git and open for edit file config. This file has list of branches created and also information if the branch is published. That is how mine looks like:
[branch "PublishedBranch"]
remote = origin
merge = refs/heads/PublishedBranch
[branch "master"]
remote = origin
merge = refs/heads/master
[branch "LocalBranch"]
[branch "NewBranch"]
remote = origin
merge = refs/heads/master